Hitting Your Target Gravity – My Brewsheet

My brewday calculation sheet that allows be to easily adjust my gravities.

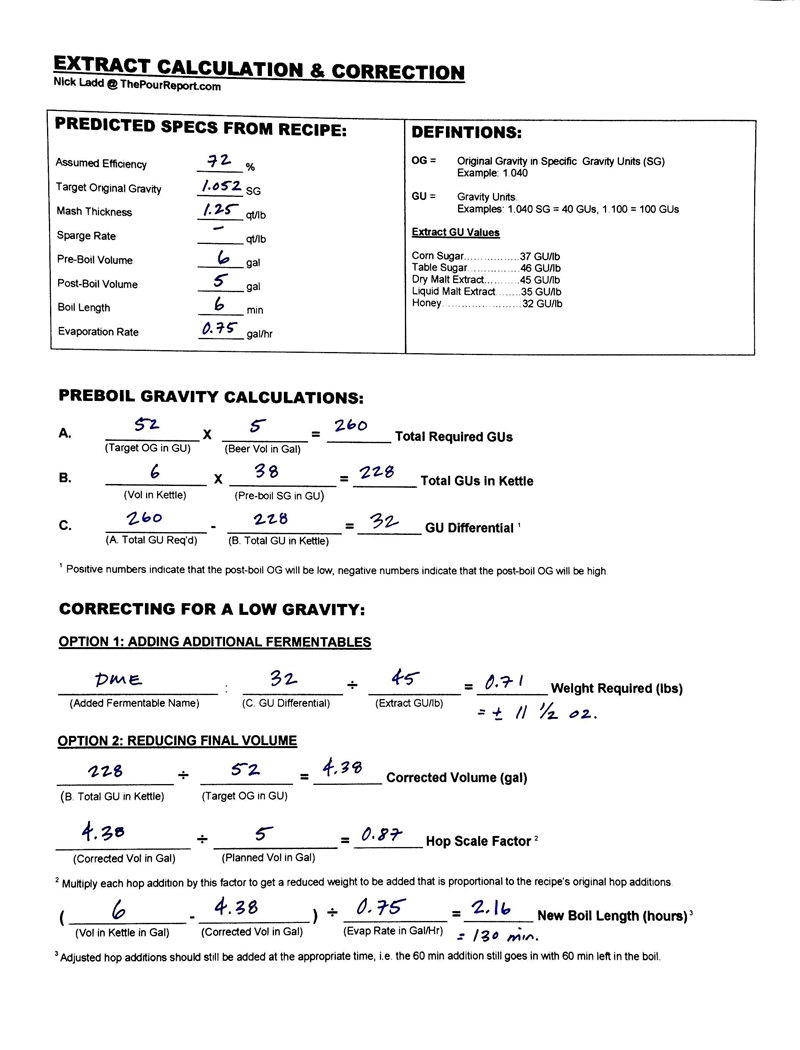
My brewsheet allows for easy adjustment of gravities. It is a simple matter of taking inventory of how much sugar is in the kettle pre-boil, and then adjusting your process or recipe on the fly, to hit your targets.

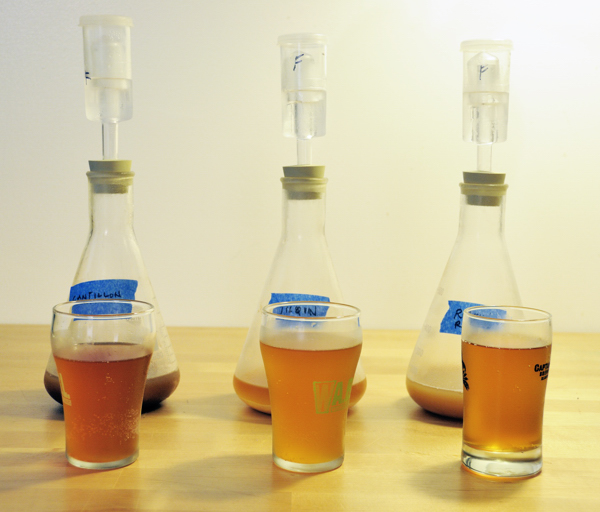
One of the most basic and important measures we take when brewing beer is specific gravity — the concentration of sugar within a wort. Original gravity is taken before fermentation begins, and when combined with additional readings during and after fermentation tells us volumes about what is occurring with your beer.

  • The alcohol content of your beer. This can be calculated by formula if we know what the starting and finishing gravities are.
  • The balance of your beer. Looking at the ratio of gravity to bitterness can tell a brewer a lot about how balanced a beer will be.
  • The fermentation status of your beer. By analyzing a recipe and process, you can estimate what your expected attenuation level is. If you know what gravity you started at, you can predict approximately where the beer will finish.

With this said, being able to predict your starting gravity and making adjustments on the fly that allow you to hit it, is key to accurately producing a recipe as well as reproducing beers you’ve made in the past.

The good news is that hitting your target gravity is easy. When brewing beer, the amount of sugar in the kettle is constant. As you boil, water evaporates and the concentration of sugar in the wort goes up. There is absolutely no difference in the amount of sugar in the kettle from the beginning of the boil until the end. Since we’re only changing one variable over the course of a boil (the amount of water), some very simple algebra (don’t worry, it is really simple) can be used to help us predict our final post-boil gravity, and make adjustments on the fly in order to hit our target gravity.

The first step in hitting your target gravity is to quantify the amount of sugar in your kettle pre-boil and check it against the amount of sugar that should be in the kettle in order to hit your target gravity. This quick check allows you to know exactly where you stand and whether to expect your starting gravity to be low or high. If you expect your gravity to be low you can add more sugar or boil longer to reduce your final volume. If you expect your gravity to be high, you can remove a portion of wort from the kettle and replace it with water or simply increase your final volume.

These are all fairly rudimentary algebra exercises. In order to simply it for my brewdays, I’ve created a fill-in-the-blank brewsheet that makes the math a very simple exercise. Additionally, the brew sheet helps me keep track of all my brewday statistics and calculate extract efficiency.

You can download your own copy, here. Let me know what you think!

Culturing Bottle Dregs

Primary fermentation for my Lambic-like beer was completed using Wyeast 3278, a Lambic-inspired blend consisting of a Belgian Saccharomyces strain, a Sherry strain, two Brettanomyces strains, a Lactobacillus strain, and a Pediococcus strain. The ratio of each microorganism is meant to emulate the exponentially more diverse cultures found in spontaneously fermented beers. Many brewers report that this particular blend tends to produce beers of much less complexity and acidity than what is found in traditional Lambics. In an attempt to add a bit of diversity to the microorganisms in my beer, I cultured and grew three different commercially available beers. Each of these were subsequently pitched into individual 1-gallon secondary fermenters containing the beer fermented previously with Wyeast 3278.

This is the caption

Cantillon Rose de Gambrinus, Tilquin Gueuze, Russian River Beatification

Growing up Your Cultures

Culturing yeast and bacteria from commercial bottles of beer is a fairly straightforward process. The main requirement is that the beer must not be filtered or pasteurized and is as fresh as possible. Luckily, this applies to many different craft beers. A little Googling will typically help you figure out if the commercial beer you’re wanting to grow yeast from can be successfully cultured.

Step 1 – Drink the Beer
It would be criminal to not consume the beer you’re culturing dregs from. Upon opening the bottle, I carefully flame the opening with a lighter. The intent is to grow what is living inside the bottle not whatever might be hanging out on the outside. I then carefully pour the beer into a glass, leaving as much sediment as possible in the bottle.

Step 2 – 200ml of 1.020 Wort
Before opening the bottle, I have 200ml of 1.020 sanitary wort made, chilled, and ready to go. To create this, I combine 12 grams of dry malt extract, a pinch of yeast nutrient, and 200ml of water in a 500ml Erlenmeyer flask and boil it for 5 minutes on the stove top to sanitize before chilling in a water bath. I pour this chilled wort directly into the bottle containing dregs, swirl it up, and cap it with a stopper and airlock. When culturing the low cell counts found in bottles of beer, I like to use an airlock to hopefully limit the amount of oxygen in the bottle and decrease the likelihood of something like acetobacter growing within. I leave this at room temperature for at least a week.

Step 3 – 200ml of 1.060 Wort
For the next step, I prepare 200ml of 1.060 wort in a 500ml Erlenmeyer flask (34 grams DME). I then swirl and pour the entire contents of the bottle I’m culturing into the concentrated 1.060 wort. This dilutes the wort back down to a reasonable growing concentration (1.040 or so) and has worked well for me as a second step. Again, I use a stopper and airlock to limit O2 availability. I let this ferment out for at least a week.

Step 4 – Chill, Decant, & Pitch
At this point in the process, I am able to see some fermentation activity in the flask. Once activity slows, I chill the culture for a few days to let it settle out, and then carefully decant and pitch the slurry. The amount of viable microorganisms in solution at this point works well to give additional character to beers, which have already been partly or completely fermented. If I wanted to use what I’ve grown as a primary fermenter, it would require an additional starter and step-up in order to produce enough viable yeast for primary fermentation.

So, how do they taste?

Before pitching my grown dregs, I tasted each sample and took notes for future comparison with the finished beer. I also wanted to ensure that none of the samples contained hints of acetic acid; which could be indicative of the presence of acetobacter which could spoil the beer.

Cantillon Rose de Gambrinus Culture
Fairly dry, some light residual sweetness left behind. Moderate plastic / burnt rubber Brett phenolic with a very light horse blanket earthiness. Sourness is low, but lactic in character. Pretty mild at this point.

Tilquin Gueuze Culture
Nice big, tart lactic nose. Some nice funky Brett horse blanket character with a touch of plastic phenol. Some tropical fruit esters, which are pretty nice. This beer has the most Brett character and sourness of the three cultures. This beer is the driest of the group yet pours with an odd-looking viscosity — probably the ‘ropey’ character often attributed to Pediococcus.

Russian River Beatification Culture
The sweetest and least fermented of the group. Tamest beer in terms of traditional Brett funk and sourness. This sample had a great tropical nose that is probably a Brett-derived ester. Very pleasant. It’ll be interesting to see where this one goes.

How about the base beer?

At the time that I racked the base Lambic to secondary it had fermented from 1.047 to 1.014 over the course of two weeks. It appears that the turbid mash produced the low fermentability I was hoping for.  The beer has a big peppery saison-like character with only a hint of tartness or Brett funk. The biggest surprise was the substantial hop bitterness and tannin in the beer. I used de-bittered hops, purchased directly through Hops Direct, which appear to have contributed a considerable amount of bitterness. I’m hopeful that since this is a long-term project the bitterness will age out. My primary concern is that the hop alpha acids will inhibit the lactic acid bacteria I’m hoping takes hold and sours the beer over time.

This is Not a Lambic

This is not a pipe.  - Magritte

This is not a pipe. – Magritte

This is not a Lambic. Many folks would call this beer a ‘pseudo-Lambic’ (pLambic), but I’m not a fan of the term. What is clear, however, is that this is the beginning of a new tradition of wild fermentation for my homebrewery.

Traditionally, Belgian Gueuze is produced by blending portions of 3-, 2-, and 1-year old Lambic. My aim with this project is to create a similar beer, using a similar recipe and methodology, while using cultured microorganisms. With some luck, this beer will become the 3-year-old aged component of a Gueuze-like blend. Of course, there are differences. Foremost, my beer is not fermented spontaneously with microbes resident in my brewery; I live way too close to the Gowanus Canal to do that. Instead, I am relying on a blend of both yeast and lactic acid bacteria produced by Wyeast and then splitting the fermentation into secondary fermenters containing a variety of cultured commercial ‘bugs’.

Aged hops used in the boil.

Aged hops were acquired from Hops Direct and used in the boil. They were quite … cheesy.

Odd looking gray goop leftover in the mash tun.

Odd looking gray goop leftover in the mash tun, a result of the turbid mash.

For this beer, I am using a very traditional blend of raw unmalted wheat and pilsner malt. I undertook a traditional turbid mash which, in a nutshell, involves pulling liquid from the mash, boiling it, and then returning it to the mash in order to hit specific temperatures. By boiling the thin portion of the mash (as opposed to the thick portion in decoction brewing), you end up denaturing a large portion of enzymes and creating a starch-filled ‘turbid’ wort. All of this is done with the intent of creating a very dextrinous wort providing fuel for the extended fermentation that this beer will undergo.

Recipe

Size: 4.25 gal
Efficiency: 74%
Attenuation: 90% (predicted)

Original Gravity: 1.047 SG
Terminal Gravity: 1.005 SG (predicted)
Color: 3.43 SRM
Alcohol: 5.58% SBV (predicted)
Bitterness: 0.0 IBU

Ingredients:
5 lb (64.5%) Belgian Pils (Castle)
2.5 lb (32.3%) Wheat Raw (Rahr)
4 oz (3.2%) Acidulated Malt (Weyermann)

3.25 oz  AGED Cascade (0% AA) – added during boil, boiled 90 m
0.5 ea Whirlfloc Tablets (Irish moss) – added during boil, boiled 15 m
0.5 tsp Wyeast Nutrient – added during boil, boiled 10 m

1 ea WYeast 3278 Belgian Lambic Blend™

Turbid Mash:

113.0 °F – 10m
136.0 °F – 5m
150.0 °F – 30m
162.0 °F – 20m
167.0 °F – 20m
175 °F – 10m

Fermentation:
1. Chill to 70°F and keep at 70°F until activity slows (1 week+).
2. Raise temp to 75°F 3 days

Secondary:
1. Rack to (3) 1-gallon glass jugs
2. Inoculate with (3) different cultures:

a. Cultured Cantillon Rose de Gambrinus
b. Cultured Russian River Beatification
c. Cultured Tilquin Gueuze

Three cultures are being stepped up and added into separate secondary fermenters.

Three cultures are being stepped up and added into separate secondary fermenters.


Pumpkin Beer – Brewday and Recipe

2 Sugar Pumpkins were heavily roasted yielded about 3 pounds of sweet pumpkin meat.

2 sugar pumpkins were heavily roasted yielding about 3 pounds of sweet pumpkin meat that was pulverized and added to the mash.

Update: You can find a full review of this beer, here.

People seem to either love pumpkin beers, or love to hate them. Craft beer drinkers consume them in quantity each fall while a certain segment of ‘beer geeks’ gleefully rant about their disdain for the style and write them off as a trend (oh, the irony). Having been part of this latter group, I can confidently say that my tune has changed. In particular, I look forward to the yearly ritual of consuming high gravity samples like Elysian’s ‘Great Pumpkin’ and the signal of fall these beers represent.

Many craft pumpkin beers feature in-your-face spicing paired with a big residual sweetness. For this beer, I am shooting for something a bit different. While malt-forward, the focus is on toasty bready notes, and less on sweet caramel. This beer features low-spicing — hopefully allowing the heavily roasted pumpkin to shine through. The goal of combining a Maris Otter base with biscuit and honey malts was to produce a graham cracker like character, similar to what is found in pie crust.

Recirculating for mashout. Very nice orange color.

Recirculating for mashout. The malt bill and pumpkin produced a very nice orange color.

Recipe

Size: 2.75 gal
Efficiency: 70%
Attenuation: 72.0% (projected)

Original Gravity: 1.086 SG (Actually hit 1.077 due to pour efficiency)
Terminal Gravity: 1.024 SG (projected)
Color: 16.26 SRM
Alcohol: 8.2% ABV (projected)
Bitterness: 27.9 (projected)

Ingredients:
6.25 lb (65.4%) Maris Otter (Crisp)
1.3125 lb (13.7%) Munich TYPE II (Weyermann)
8 oz (5.2%) Biscuit Malt (Dingeman)
8 oz (5.2%) Flaked Oats (Briess)
6 oz (3.9%) Crystal 45 (Crisp)
6 oz (3.9%) Honey Malt (Gambrinus)
4 oz (2.6%) Belgian Caravienne (Belgian)
3 lb Roasted Sugar Pumpkin

8 g (100.0%) Magnum (14.5%) – added during boil, boiled 90 m
0.5 ea Whirlfloc Tablets (Irish moss) – added during boil, boiled 15 m
0.5 tsp Wyeast Nutrient – added during boil, boiled 10 m

1 ea Cinnamon (Stick) – Whirlpool 10m
.125 tsp Clove (whole) – Whirlpool 10m
.125 tsp Nutmeg (ground) – Whirlpool 10m

WYeast 1056 American Ale™
1 ea Vanilla Bean Soaked in Bourbon (1 bean in 2 oz. bourbon) – Secondary

Mash:
120 °F – 5m (Beta Glucan)
154 °F – 60m (Saccarification)
168 °F – 10m (Mashout)

Yeast Starter:
Final Volume into Fermenter = 2.25 Gallons
Yeast Required = 132  billion (per Mr. Malty)
Yeast Production Date: 8/16/13
Yeast Starter = 1L @ 1.040 on stir plate (per Mr. Malty) =  4 1/8oz. DME

Fermentation:
1. Chill to 60* F and keep at 62* F until activity slows (1 week+).
2. Raise temp to 70*F 2 days
3. Crash to 32*F 5 days