Sour Mashed Berliner Weisse with Brett Trois

Reheating and recirculating the sour mash after 60 hours of sour-mashing.

Recirculating and reheating the mash after 60 hours of sour-mashing.

My first batch of Berliner Weisse left me confident that sour mashing is a viable option for creating brightly acidic sour beers in short order. I’ve had a number of wonderful sour mashed beers along with quite a few terrible ones. A lot of people proclaim that sour mashing is a bit of a crap shoot, but I believe with careful process control, you can utilize sour mashing with a high success rate. It seems that the key to success with sour mashing is creating an environment that favors the lactic acid production you’re looking for while discouraging the growth of other bacteria and yeast that can easily fowl your mash with pretty horrific off-flavors.

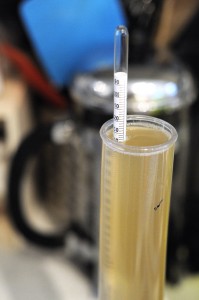
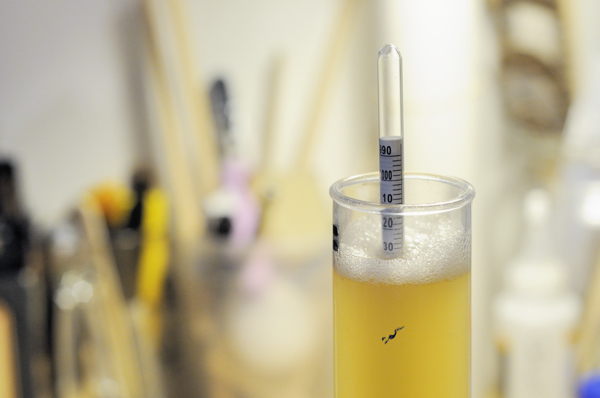
My primary concerns are creating an anaerobic (no oxygen) environment, maintaining temperatures above 105°F, and pre-acidifying the mash. An anaerobic environment is achieved by thoroughly flushing the fermenter with C02 gas and then sealing the lid. Temperatures are maintained by insulating the mash tun and periodic hot water additions. Pre-acidification is achieved through a healthy dose of acidulated malt at the end of the mash regiment. After a 60 hour sour mash, the liquid was very tart and clean. There was no pellicle, mold, or otherwise odd looking growths on the surface of the mash. At this point in the process, you’re looking for a bright clean acidity — more similar to yogurt  (lactic) than vinegar (acetic). If your mash smells or tastes like rotten vegetables, baby diapers, vinegar, or other funky flavors, your mash likely went off. Boiling and subsequent fermentation may drive off some of these offensive aromas, but chances are pretty slim that they will be eliminated completely.

_DSC0547After sour-mashing I retrieved the soured wort and boiled it for 30 minutes to achieve a minor reduction in volume, kill any bacteria, and achieve a slight amount of bitterness. I cooled the wort and pitched Wyeast’s German Ale strain. I have heard antidotal evidence that low pH can adversely effect yeast fermentation. I can offer my own contrary antidotal evidence — my low pH wort exhibited a very vigorous fermentation and attenuated well.

UPDATE 11/16/2013: After about 2 weeks in primary, I seem to be experiencing a pH related issue with this beer. Fermentation appeared extremely vigorous. It has however stopped at 1.010, which is most likely related to the beer’s low pH. At this point I am not comfortable bottling with a secondary Brett Trois strain. Instead, I have racked the beer to a secondary fermenter and pitched the Brett in an attempt to reach terminal gravity prior to packaging and bottle conditioning.

Wyeast describes the German Ale strain as a true top cropping yeast... I concur.

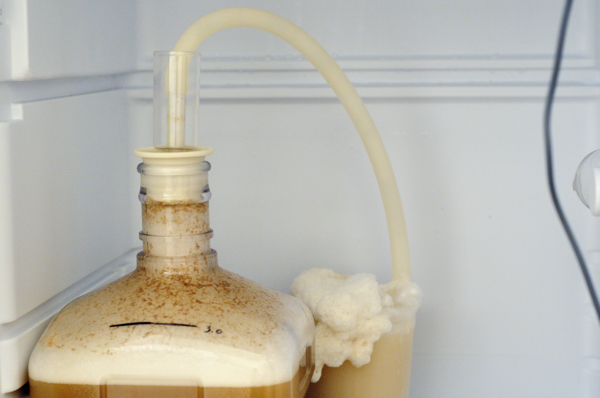
Wyeast describes the German Ale strain as a true top cropping yeast. Fermenting at 64°F created a large amount of yeast blowoff.

Recipe

Size: 3.25 gal
Efficiency: 68%
Attenuation: 80.0% (projected)
Boil Length: 30m

Original Gravity: 1.034 SG
Terminal Gravity: 1.007 SG (projected)
Color: 3.99 SRM
Alcohol: 3.59% ABV (projected)
Bitterness: 5.0 IBUs

Grist:
2 lb (43.2%) Bohemian Pilsner Malt (Weyermann)
2 lb (43.2%) White Wheat (Briess)
2 oz (2.7%) Victory® Malt (Briess)
8 oz (10.8%) Acidulated Malt (Weyermann) – 2oz during mash, 6oz to cap mash post sugar conversion

8 g Hallertauer Hersbrucker (4.3% AA) – 30m
0.5 ea Whirlfloc Tablets (Irish moss) – 15m
0.5 tsp Wyeast Nutrient – 10 m

WYeast 1007 German Ale™ – Primary Fermentation
White Labs WLP644 Brettanomyces Trois – Added to individual bottles during bottle conditioning. Ended up adding it in secondary before packaging.

Water Treatment:
Carbon filtered Brooklyn water (very soft) with 2g Gypsum and 4g Calcium Chloride added to mash.

Mash Regiment:
60m – 148 °F
10m – 154 °F
10m – 168 °F

Sour mash 60 hours:
1. Complete mash regiment above. Let mash cool to 128°F. Minimize stirring and aeration of wort.
2. Add 4 oz uncrushed grain & remainder of acidulated malt (6 oz).
3. Cover mash bed with aluminum foil, purge with CO2, and seal mashtun.
4. Insulate the mash tun and let rest for 60 hours.
5. Add boiling H2O to increase sour mash temp as required to keep above 105°F.
6. After 60 hours, increase mash tun temperature to 168°F and transfer wort to kettle.

Fermentation:
1. Chill to 64°F and keep at 64°F until activity slows (1 week+).
2. Raise temp to 68°F 2 days
3. Drop temperature to 32°F over the course of 4 days. Hold at 32°F for 2 days.

Packaging:
Prime with sugar as required to achieve 3 volumes of CO2. Inoculate half the bottles with Brett Trois (WLP644) for future side-by-side comparisons. Ended up adding the Brett to secondary in bulk prior to packaging.

100% Sour Mash Berliner Weisse Tasting

Less than a week after pitching yeast, my Berliner Weisse was carbonated and ready for consumption. The beer finished just in time for the NYC Homebrewers Guild annual picnic and the intense NYC heat (and humidity) wave that followed shortly afterwards. I couldn’t have made a beer in a more timely manner. At only 3.4% ABV, I was able to push it from grain to glass faster than any other beer I’ve brewed.

100% Sour Mash Berline Weisse

Perhaps the best beer to consume during the doldrums of a NYC heat wave?

Beer Tasting

Judged as a BJCP Category 17A Berliner Weisse.

Aroma (10/12)
Initially the beer presents with a nice and clean, tangy lactic aroma that is in some ways reminiscent of the acidity found in yogurt. In the background is a round and almost honey-like pilsner malt aroma with a hint of toasted cracker. Also apparent is a very light herbal hop aroma that is a bit out of place in the style, but welcome in such a young beer. There is a light touch of a pear ester. No diacetyl, DMS, or other off-flavors.

Appearance (3/3)
Quite hazy and very pale. There is a bright white foam that easily builds and persists throughout consumption.

Flavor (16/20)
Simple and delicious. The beer somehow manages to have an acidity that is both round and soft, while also quite intense and refreshing. The acid is clean and pleasant. There is a nice simple and easy-drinking malty character that showcases the pilsner malt sweetness while having a crisply dry crackery finish (probably from the wheat). None of the hops I got on the nose can be tasted. The malt is maybe a hair too sweet for the style. There is just a hint of perceptible bitterness.

Mouthfeel (4/5)
The dryness of this beer combines with the acidity and medium-high carbonation to be quite crisp. The body is maybe a touch full. There is no hint of thinness or the watery character that is often found in low-alcohol beers.

Overall Impression (8/10)
This is an excellent example of the style. It captures the acidity and refreshing qualities that are the hallmark of the style and hits all the right marks in terms of malt character. There are none of the off-flavors sometimes associated with sour mashes. The only detractor is that perhaps it is a touch sweet; likely caused by me undershooting my attenuation goals. To make this beer better, I would allow it to ferment for an extra day or two and hopefully squeeze a couple more points of  attenuation out of it.

Total: 41/50 (Excellent)

Berliner Weisse Recipe (Sour Mash) and Brewday

Using blankets and coats to insulate my mashtun.

Using blankets and coats to insulate my mashtun.

I love sour beer. I love simple beers. I love Berliner Weisse.

Berliners are low in alcohol and crisp, featuring a clean lactic sour character that can be quite tart and thirst quenching. They are easy drinking and sessionable. The best ones have an almost yogurt-like tartness produced by a lactic fermentation and complemented by a light and almost crackery wheat malt character.

The key to this Berliner recipe is creating a clean and substantial tart sourness using sour mash techniques. The beauty of a sour mash is that you don’t have to grow potential contaminants on the cold side of your brewhouse. The basic process involves mashing as you typically would and then post conversion inoculating the mash with a portion of raw grain (some inoculate with a commercial lacto pitch). The mash is allowed to naturally sour before boiling, chilling, and pitching yeast. Successfully sour mashing is all about setting the right environment for naturally occurring lactobacillus on the grain to thrive while discouraging other microbial action (molds, other bacteria, wild yeast, etc.). While researching sour mash, I ran into a lot of sources describing the putrid aromas that they can sometimes produce. Descriptors like gym socks, rotten vegetables, stinky cheese, and baby diaper are common when sour mashes are poorly executed, and are completely avoidable. By manipulating pH, temperature, and exposure to oxygen you can encourage clean lactobacillus growth while minimizing the growth of unwanted organisms.

pH – My recipe includes a large charge of acidulated malt, post sugar conversion, used to drop the mash pH into a range that lactobacillus can thrive at, but unwanted organisms do not.

Heat – My recipe inoculates the sour mash at the upper end of the temperature range that lactobacillus can thrive (126° F) and keeps the mash hot for 48 hours, using care to not allow the mash temp to drop below 106° F.

Oxygen – Lactobacillus thrives in anaerobic environments, while other organisms that throw off-flavors are aerobic. In order to encourage lacto fermentation, it is important to purge the mash tun using CO2 and seal it in order to prevent oxygen exposure. Additionally, I used de-aerated water (boiled) to mash with and was careful to not excessively stir the mash.

Recipe

Size: 3.24 gal
Efficiency: 76% (measured)
Attenuation: 72% (measured)
Boil Length: 30 minutes

Original Gravity: 1.036 (measured)
Terminal Gravity: 1.010 (measured)
Color: 3.03 SRM
Alcohol: 3.4% ABV (calculated)
Bitterness: 5.0 IBUs

Ingredients:
2.5 lb (52.6%) Bohemian Pilsner Malt
1.75 lb (36.8%) White Wheat
2 oz (2.6%) Acidulated Malt (for mash pH correction)
6 oz (7.9%) Acidulated Malt (added during 156° F rest to acidify sour mash post sugar conversion)
0.25 lb (0.0%) Rice Hulls (added during lauter)

8 g (100.0%) Hallertauer Hersbrucker (4.3%) – boiled 30 m
0.5 ea Whirlfloc Tablets (Irish moss) – boiled 15 m
0.5 tsp Wyeast Nutrient – boiled 10 m

1 ea WYeast 1007 German Ale™

Mash:
60 min – Rest at 148 °F
10 min – Rest at 156 °F
10 min – Mashout at 168 °F

Sour Mash:
1. De-aerate mash strike water by boiling.
2. Cool mash water to strike temperature.
3. Complete mash regiment and let it cool in mash tun to 126°F. Minimize stirring and aeration of wort.
4. Add 4 oz uncrushed pilsner malt to inoculate wort.
5. Cover mash bed with aluminum foil, purge with CO2, and seal mashtun.
6. Wrap mash tun in blankets and rest 48 hours.
7. Add boiling H2O to increase sour mash temp as required.

Brew Day:
1. Mash out grain bed.
2. Lauter
3. Boil, chill, and pitch yeast.

Yeast Pitch:
Final Volume into Fermenter = 2.75 Gallons
Yeast Required = 68 billion (per Mr. Malty)
Yeast Production Date: 6/11/13
Yeast Starter = (None Required)

Fermentation:
1. Chill to 64° F and keep at 64° F until activity slows.
2. Raise temp to 68° F until activity is complete.
3. Crash to 32° F for 36 hours.
4. Keg and force carbonate to 3 volumes CO2.

Brewing Notes:

Gravity Reading - Post boil the wort is quite tart.

Gravity Reading – Post boil the wort is quite tart.

– Originally I was shooting for a 1.035 OG using an anticipated efficiency of 68%. My mash efficiency was considerably greater hitting 76%. I adjusted my final volume and interrelated hop additions in order to achieve an original gravity of 1.036.

– After sour mashing for 24 hours I tasted the mash liquid. It was barely tart, but quite clean with no off-flavors. Mash liquid was tasted again after 48 hours and had a substantial clean sourness with no off-flavors.

– My goal was to sour mash for 48 hours, brew, and then have a carbonated keg to serve 7 days later. I did this successfully, serving the carbonated beer less than 7 days from when I pitched my yeast. I rushed my fermentation likely causing the yeast to attenuate to only 1.010. I was hoping for 1.007 (80% apparent attenuation). Had I given the yeast another 2-3 days to work, I believe I would have achieved a 1.007 terminal gravity.

Spazzy Man Wheat Recipe

A good friend of mine originally exposed me to an amazing beer from New Glarus Brewing called Dancing Man Wheat. This beer, while outside of the OG specification for a traditional hefeweizen is an amazing example of the style. New Glarus’ weizen yeast strain and their processes restrain the over-the-top banana and bubblegum character that dominate most homebrew versions of the style. Instead, it has a great spice character of cinnamon and clove which complement its smooth and creamy mouth feel. In addition, I pick up an almost tropical fruit note, likely a yeast derived flavor.

For this recipe I started with a few things I knew about the beer (like the percentage of oats I took from Brewing with Wheat by Stan Hieronymus) as well as other theories about the way New Glarus brews. I then critically tasted the beer, researched hefeweizen brewing techniques, and brewed my initial batch. After the initial batch, I made a few recipe tweaks, lowered the OG to better fit the style guideline, and then rebrewed using a yeast culture I grew from the bottle dregs of Dancing Man. While not a spot on clone, this beer is very much in the same family as New Glarus’ beer, and is absolutely delicious.

Specifications

Volume: 5.74 Gallons
Original Gravity: 1.054
Terminal Gravity: 1.007
Color: 8.97 SRM
Alcohol: 6.11%
Bitterness: 14.1
Efficiency: 68% (tweak recipe to match efficiency of your brew house)
Boil Length: 90 Minutes

Ingredients

6.5 lb (56.5%) Pale Wheat Malt; Weyermann
14 oz (7.6%) Unmalted Wheat
3 lb (26.1%) Bavarian Pilsner; Weyermann
12 oz (6.5%) Oats (Pregelatinized Flakes); Briess
2 oz (1.1%) Caramel Malt 40L; Briess
4 oz (2.2%) Honey Malt
Rice Hulls as Required
30 g (100.0%) East Kent Goldings (4.7%) – added during boil, boiled 60 m
1 ea Whirlfloc Tablets (Irish moss) – added during boil, boiled 15 m
.75 tsp Wyeast Nutrient – added during boil, boiled 10 m
1800ml starter of New Glarus Weizen Yeast – User Wyeast 3068 as a replacement

Water

Carbon-filtered Seattle water which is very soft.  All salts added to grist before mashing in.
2.0 g Gypsum (Calcium Sulfate)
6.0 g Calcium Chloride (Calcium Chloride)
2.0 g Epsom Salts (Magnesium Sulfate)

Mash

15 Minute Ferulic Acid Rest at 110° F
Pull Decoction to Raise to Saccharification Rest
40 Minute Saccharification Rest at 156° F
Pull Decoction to Raise to Mashout Rest
10 Minute Mashout Rest at 170° F
Sparge at 170° F and collect sufficient runnings to hit pre-boil volumes.

Fermentation

  1. Chill wort to 58° F and pitch yeast slurry.
  2. Set temp controller to 60° F and allow to rise to this temp.
  3. Ferment at 60-62° F until beer is 2-6 points from terminal gravity then raise temp to 68° F.  Hold at 68° F for 2 days.
  4. Chill fermenter to 34° F and package.  Bottle conditioning adds an authentic feel to this beer.

Awards

The beer brewed from this recipe has won as a BJCP Category 15a. Weizen/Weissbier:

  • 2012 NHC First Round – 1st Place

Düsseldorf Altbier Recipe

Alt (‘old’ in German) survives in Dusseldorf, holding on to a lonely buoy within a sea of lagers that is modern-day Germany. Much like its cousin from Cologne Kolsch, this beer is fermented with an ale yeast at cooler than normal temperatures to induce a clean, malty, and firmly bitter beer. This beer features a deep amber color with crystal clarity and garnet highlights. Truly a great beer to both drink and behold.  My version is less-sweet than a lot of the homebrew examples that are out there, featuring only 6.5% crystal malt. Instead, this beer receives a toasty (think rich bread crust) melanoidin induced malt flavor from a large percentage of Munich malt as well as a dash of aromatic malt. This is a perfect sessionable beer with enough complexity and flavor to keep you interested, and a low enough ABV to keep your senses.

Specifications

Volume: 6.22 Gallons
Original Gravity: 1.050
Terminal Gravity: 1.013
Color: 15.04 SRM
Alcohol: 4.85%
Bitterness: 43.4
Efficiency: 79% (tweak recipe to match efficiency of your brew house)
Boil Length: 90 Minutes

Ingredients

7.5 lb (64.5%) Pilsner Malt; Weyermann
3 lb (25.8%) Munich TYPE II; Weyermann
.75 lb (6.5%) German CaraMunich III
.25 lb (2.2%) Aromatic Malt; Best Malz
2 oz (1.1%) German Carafa II
34 g (54.5%) Magnum (12.5%) – added during boil, boiled 60 m
.5 oz (22.7%) Czech Saaz (3.1%) – added during boil, boiled 20 m
1 ea Whirlfloc Tablets (Irish moss) – added during boil, boiled 15 m
.5 oz (22.7%) Hallertauer Mittelfrüher (3.4%) – added during boil, boiled 10 m
.5 tsp Wyeast Nutrient – added during boil, boiled 10 m
1 ea White Labs WLP036 Dusseldorf Alt

Water

Carbon-filtered Seattle water which is very soft.  All salts added to grist before mashing in.
2 g Calcium Chloride (Calcium Chloride)
2.0 g Epsom Salts (Magnesium Sulfate)
4.0 g Chalk (Calcium Carbonate)

Mash

60 Minute Saccharification Rest at 151° F
10 Minute Mashout Rest at 170° F (I pulled a decoction to hit mashout temp)
Sparge at 170° F and collect sufficient runnings to hit pre-boil volumes.

Fermentation

  1. Chill wort to 58° F and pitch yeast slurry.
  2. Set temp controller to 60° F and allow to rise to this temp.
  3. Ferment at 60-62° F until beer is 2-6 points from terminal gravity then raise temp to 68° F.  Hold at 68° F for 2 days.
  4. Chill fermenter to 34° F.  Rack beer off yeast and lager near freezing the 4-6 weeks.

Awards

The beer brewed from this recipe has won as a BJCP Category 7c. Dusseldorf Altbier:

  • 2012 NHC First Round – 1st Place